

How To Create A Module In Jupyter Notebook
Learn about Jupyter Notebook, part of the Jupyter Lab interactive IDE that is ideal for Data Science. We'll explore the advantages of using it over a regular IDE, show you how to install Jupyter Notebook and Jupyter Lab, and demonstrate its abilities.
Jupyter Lab vs Jupyter Notebook
JupyterLab is a web-based, interactive development environment. It's most well known for offering a so-called notebook called Jupyter Notebook, but you can also use it to create and edit other files, like code, text files, and markdown files. In addition, it allows you to open a Python terminal, as most IDEs do, to experiment and tinker.
JupyterLab is flexible: you can configure and arrange the user interface to support a wide range of workflows in data science, scientific computing, and machine learning. It's also extensible: everyone can write plugins that add new components and integrate with existing ones.
JupyterLab supports over 40 other programming languages, like Java, Scala, Julia, and R. However, I'll focus solely on Python in this article.
On the other hand, Jupyter Notebook is a REPL-like environment that fuses code, data, and documentation. So in short, JupyterLab is the browser-based IDE, while Jupyter Notebook is the Notebook component inside it. You can install Jupyter Notebook separately if you want, and I'll show you how in this article.
Advantages of using Jupyter Lab and Notebook
Python application developers often prefer and work with a regular Python IDE like VSCode, which facilitates debugging, unit testing, deployment, and version management. In contrast, (data) scientists and data analysts have a different focus and often prefer a Notebook style IDE. Let's look at some of the advantages these notebooks have to offer.
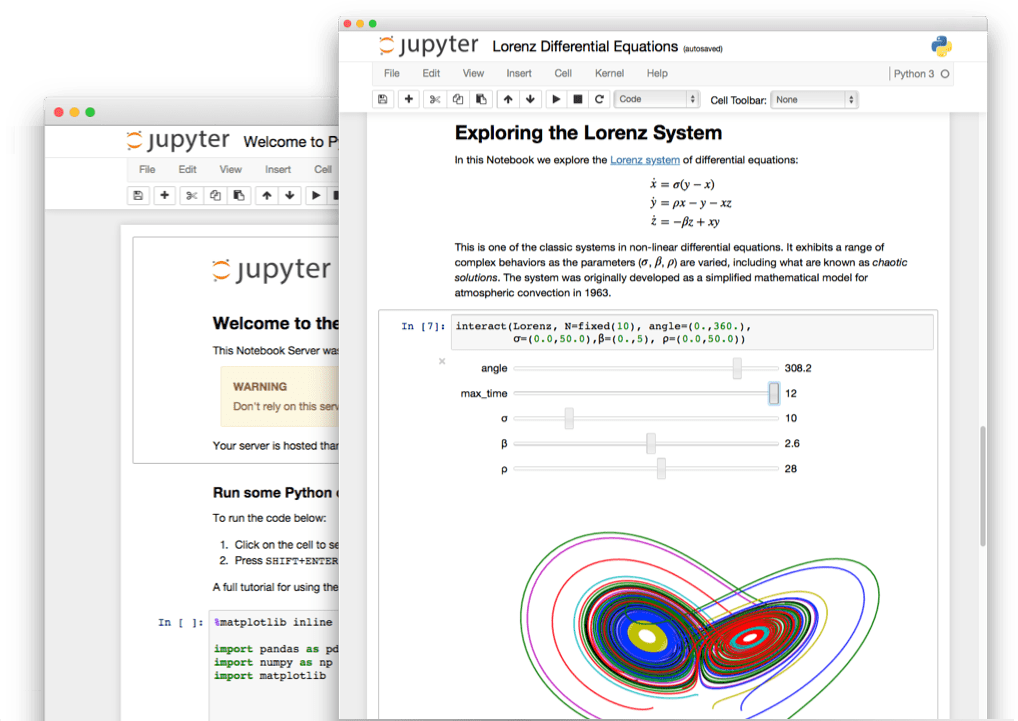
Combine and document code and results
The biggest advantage of using notebooks is that it allows you to combine three things into one environment:
- documentation,
- code,
- results
All the while offering an interactive environment in which you or your fellows can tinker and experiment. The following image perfectly demonstrated this:
Interactive exploration
A Notebook allows you to explore your data interactively. While doing so, the Notebook serves as a log of what you did and how you did it. So a Notebook is much more geared toward those working with and analyzing data than regular IDEs. However, some IDEs, like VSCode, will offer a built-in Jupyter Notebook (see further down this article).
It's what the others use
Sometimes it helps to go with the flow. In this case, you'll notice that many others in data science are using Jupyter Notebooks. This has a couple of advantages on its own:
- It's easy to exchange and share your work.
- There are loads of plugins created by fellow data scientists, specifically targeted at people like you.
How to install Jupyter Notebook and Lab
Like all Python software, installing Jupyter Lab is a breeze. I'll demonstrate how to install with both Pip and Conda. One thing to note beforehand: I recommend installing this system-wide. With most packages, I'm stressing the importance of using a virtual environment. However, tools like this you want to install once.
Install Jupyter Lab and/or Notebook with Pip
As noted above, you want to install Jupyter Lab system-wide, or at least in your local bin folder. Installing the package globally with Pip requires the -g option. On many Linux systems, however, Pip will install the package in a .local/bin folder if you don't specify -g and if you're not using a virtual environment. You can force this behavior by using the --user option. The advantage is that you don't need root access to the system you're working on.
So, the most recommended way to install Jupyter Lab is:
$ pip install --user jupterlab
If you only want Jupyter Notebook, use this instead:
$ pip install --user notebook
Install JupyterLab with Conda
JupyterLab can be installed withmamba andconda as well:
$ mamba install -c conda-forge jupyterlab or... $ conda install -c conda-forge jupyterlab
Like with Pip, if you want to only install Jupyter Notebook, use this:
$ mamba install -c conda-forge notebook or... $ conda install -c conda-forge notebook
Start and explore JupyterLab
How to open Jupyter lab from the command-line
If you followed the installation instructions, you should be able to start Jupyter Lab with:
$ jupyter-lab (a bunch of log message will follow)
How to open Jupyter Notebook from the command-line
If you want to only start a Notebook, use this:
$ jupyter-notebook (a bunch of log message will follow)
Adding to your PATH
If you get an error like "command not found", don't panic just yet. Unfortunately, some systems don't have the .local/bin directory in the $PATH variable. On Linux and OS X, a quick fix is to add it temporarily like this:
PATH="$HOME/.local/bin:$PATH"
However, this will only work as long as you keep the terminal window open. So, to make this permanent, I recommend adding the following snippet to the end of your ~/.profile file:
# set PATH so it includes user's private bin if it exists if [ -d "$HOME/.local/bin" ] ; then PATH="$HOME/.local/bin:$PATH" fi
All it does, is add the .local/bin folder to the PATH, but only if it actually exists.
The .profile file is loaded once when you login to your system. You you probably need to logout and login to apply the changes. In case you use zsh instead of Bash (zsh is the default on MacOS these days), you may want to try adding the snippet about to a file called .zprofile instead.
Your first steps in a Notebook
If you start Jupyter Lab or Notebook, it will automatically open your browser. If it didn't, you can go to http://localhost:8888/ manually to open it. Once there, create a new Notebook, e.g. by clicking File -> New -> Notebook.
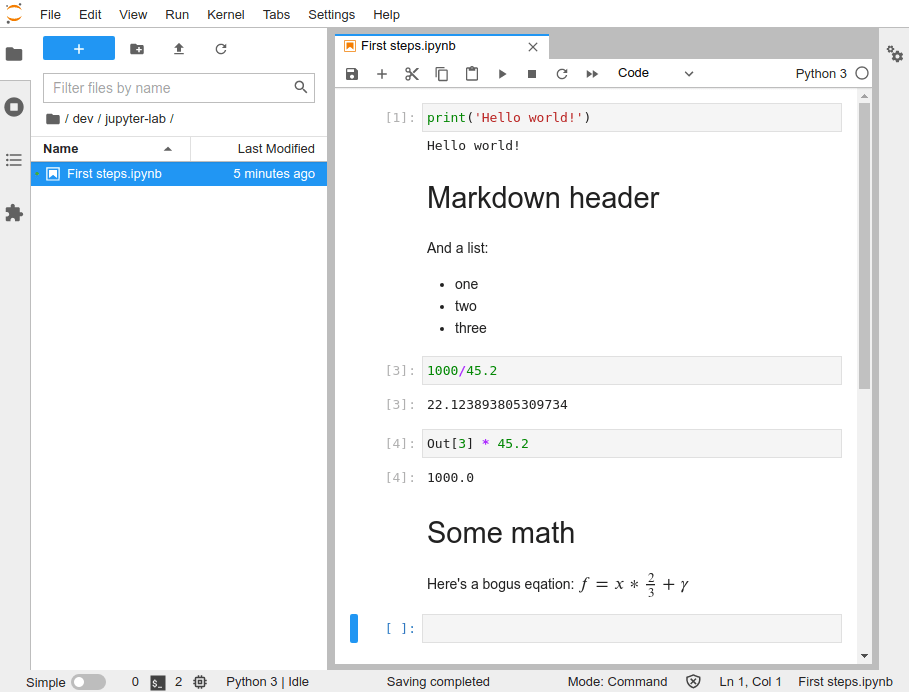
In the following screenshot, I created a new Notebook named 'First steps'. There are a couple of noteworthy things to see:
- Your input is place in a 'cell', and each cell is numbered
- You can access the previous cells by using the
InandOutarrays. E.g.,Out[3]in the example below gives us the output of the expression in theIn[3]cell - You can also change the cell type to Markdown, for more on this, see below
- If you want to apply or execute your cell, press Shift + Enter.
Cell types
At the top of your notebook, there is a dropdown that allows you to change the cell type. All you need to care about for now, are the types 'Python' and 'Markdown'.
Python
A Python cell contains Python code. This can be any valid code, so all these are allowed:
- One simple line of code
- An import statement
- A function definition
- A complete class definition
- Etcetera!
Markdown
Markdown is a lightweight markup language for creating formatted text. You can use it to create headers, lists, code snippets, and most other things you can think of. You might be familiar with it if you ever created a README.md file on GitHub, for example.
Markdown is great for adding documentation to your notebook. For most, the use of a Markdown cheat sheet is enough to get started quickly.
Formulas
You can enter nice-looking formulas using Markdown as well. Internally, Jupyter uses MathJax to format and display formulas. A formula starts and ends with either a single or a double dollar sign:
-
$ .... $: in-line; the formula is in line with the rest of the current sentence -
$$ .. $$: display mode; the formula stands out from the rest of the text
Inside, you need to enter a Tex-based equation. If you want to see all the options and play around with such equations, I recommend this website that offers a Tex equation editor.
JupyterLab plugins
If you click on the puzzle icon at the left of the screen, you'll get a list of plugins that can be installed directly. There are lots of plugins, and many of them will add extra visualization capabilities or integration with products like Tableau.
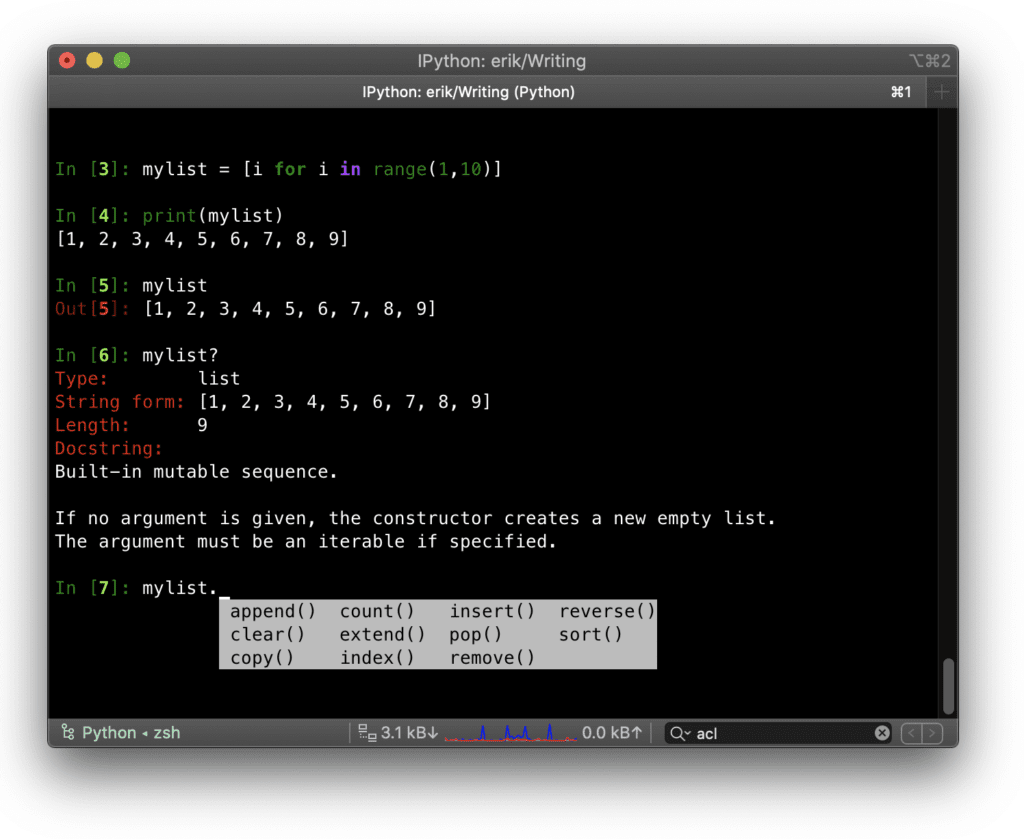
IPython
Internally, Jupyter Notebooks use a project called IPython. If you tend to use the Python REPL a lot, I recommend you to read our page on IPython since it is a great alternative to the regular REPL. I use it a lot personally, and I can't recommend it enough! For example, it's worth it just for its terrific auto-completion, and if you are used to Jupyter Notebooks, you'll feel right at home, obviously.
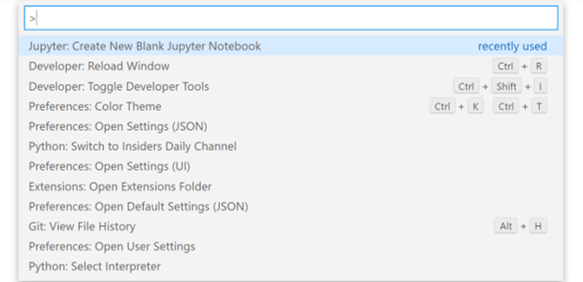
Jupyter Notebook in VSCode
If you're a VSCode fan, like me, you need to check out the VSCode extension that allows you to create and work with notebooks directly inside a VSCode tab. If you open up the command pallet, e.g. with ctrl + shift + p, start typing "Jupyter" to create, open, and export Notebooks.
Keep learning
It's always worth visiting the official project website, for the latest news and documentation around Jupyter Lab and Jupyter Notebook.
How To Create A Module In Jupyter Notebook
Source: https://python.land/data-science/jupyter-notebook
Posted by: rodriguezmolaing.blogspot.com
0 Response to "How To Create A Module In Jupyter Notebook"
Post a Comment